Showing posts with label blog hop. Show all posts

Thursday, May 17, 2018

Jazz up a Jacket with Expo International Trim


I am so happy to be hopping... blog hopping that is! This month's Designer Crafts Connection blog hop is featuring Expo International trim. Expo International makes some of the most beautiful ribbon, trims, and appliques on the market. Follow me as I show you how I used some amazing appliques to take a plain black blazer from "blah" to "WOW", all with absolutely no sewing!

First, let's talk a little about my inspiration for this project. I love classic country music. I was raised on those old country songs and even went to college in Nashville, TN. One of the things that I love from the old days of country are the highly decorated "Nudie suits" that were worn back in the day by Porter Wagner and Dolly Parton (the suits were made by a famous tailor named Nudie Cohn). The suits featured lots of sequins and embroidery.


I wanted to make my own version of the Nudie suit, but a little more contemporary and a little more subtle, but still with lots of flair... and that's where Expo International comes in!

Materials used:

How to create:
  1. Cut beaded trim to fit length of all pocket openings. This trim is so cool because you can cut it with scissors! It has a really neat, rubbery back to it that holds all those beads together.
  2. Attach beaded trim to all pocket openings (breast pocket and 2 lower pockets) with fabric glue. I used Fabri-Tac from Beacon Adhesives.
  3. Iron on embroidered letters on front and back. I placed the front letter right on the breast pocket, directly under the beaded trim.
  4. Iron on rose applique and embroidered letter onto the back of the jacket.
And that's it! It was so easy and I didn't have to sew one single thing! Now I have an updated take on the classic country suit jacket with just enough flair that will make everyone take notice.

If you want to see more gorgeous projects using Expo International trims and appliques, click HERE for all of the other designers' blogs in the hop. We are also giving away a prize pack full of Expo goodies -- just comment on the DCC blog post and tell us what projects you loved!


Happy crafting!


Thursday, February 22, 2018

Mixing It Up with Marabu!

Today here on Forty11 Designs, I am mixing it up with Marabu and the Designer Crafts Connection! I'll show you how you can make totally cute painted spring vases using Marabu Porcelain and Glass Paint.


Marabu makes amazing color products for fabrics, mixed media, and more, but our blog hop is focusing on their porcelain and glass paints. These paints are highly pigmented, come in bottles and markers, and (the best part) are dishwasher-safe!

For this project, I picked up these colored vases at the dollar store (y'all know that is my favorite place for crafting materials). They had a lot of great colors, but I went with yellow, pink, and purple for a springtime feel.


I made sure to wash them thoroughly so that the paint would have a clean surface to adhere to. I then used an adhesive stencil on two of the vases (a chevron pattern on one and a flower pattern on the other), and applied the paint with a sponge paintbrush with a pouncing motion.


For the other vase, I went with a more free-hand approach. I made polka dots in white, blue, and green just using a round sponge pouncer. Now, I'm gonna admit something here... I totally forgot to take a photo of that process, but you can basically figure it out from the final photo!

How awesome and easy is that? Just think of all the plain glassware from the dollar store that you can turn into cool custom pieces!

There are so many other ways to use Marabu Porcelain and Glass Paints and Markers -- just follow these links to the other DCC blogs in this hop!


But that's not all! Marabu is giving away an assortment of their products (retail value $75)! 


Just click here and comment on the Marabu post on the Designer Crafts Connection Facebook page to enter. (This giveaway is open to U.S. residents only.) Good luck and stay crafty!

Thursday, September 28, 2017

Hopping with Buttons Galore and Poppystamps -- Holiday Card


Are you hopping with us today?  If you are you should have reached me from Jeanne Jachna's blog.  If you’d like to start at the beginning and get all the details, you can find them at the Buttons Galore and More blog!

My project is a holiday card using an awesome die from Poppystamps and buttons and sequins from Buttons Galore and More!


Materials used:


Instructions:

  1. Using a Sizzix Big Shot machine and the Poppystamps "Open Hillside" die, die cut one card front from white cardstock. Ink edges of die cut if desired. Attach the die cut to the blue card using a tape runner.
  2. Remove shanks from backs of snowflake buttons. Attach buttons to card using small pieces of Supertape.
  3. Using tape runner, attach stars from "Festival of Lights" sequin mix to card front (interspersed among snowflakes).
  4. Line all 4 edges of the white die cut with Supertape. Sprinkle with "Winter White" sequin mix.
  5. Place letter stickers at top of die cut directly under the sequins. 


This card is easy to make, but looks like you spent tons of time!

Ready to see more designs made with products from both Poppystamps and Buttons Galore and More? The next stop on this shop is Marybeth Lopez

But before you go, please leave me a comment!  There’s some blog candy up for grabs and you have to comment to win!   Winners will be selected randomly from comments on blogs on this hop. You have until 11:00 PM (US EST) on October 1 to leave a comment to enter to win.  Winners will be announced on October 2.

Here’s a complete hop list for your convenience:


Buttons Galore and More Blog http://buttonsgaloreandmore.net/
May Flaum:  http://mayflaum.com/
Robin Tharaldson  https://www.stamptress.com/

Poppystamps Blog   http://poppystamps.typepad.com/

Wednesday, April 19, 2017

Mother's Day Card featuring Rinea Foil


Show your mom just how much you love her with a beautiful handmade card using Rinea double sided foil paper!

Thursday, March 16, 2017

Etched Glass Lantern featuring Etchall


Hello crafters -- Lorrie here and today, I am " blog hopping" with the Designer Crafts Connection and Etchall! We are bringing you some really cool etched glass crafts using Etchall, a glass etching cream that is like no other. I will show you how to turn plain glass into frosted "antiqued" glass using nothing but Etchall and a sponge!

Wednesday, July 20, 2016

Celebrating with Deflecto and DCC


"Celebrate good times, come on!"

OK, so I may not be Kool and the Gang, but celebrations are awesome! This blog hop with Deflecto Crafts and the Designer Crafts Connection is all about celebrating: weddings, birthdays, holidays, and any other occasion that make you want to party. And what better way to party than with dessert?!

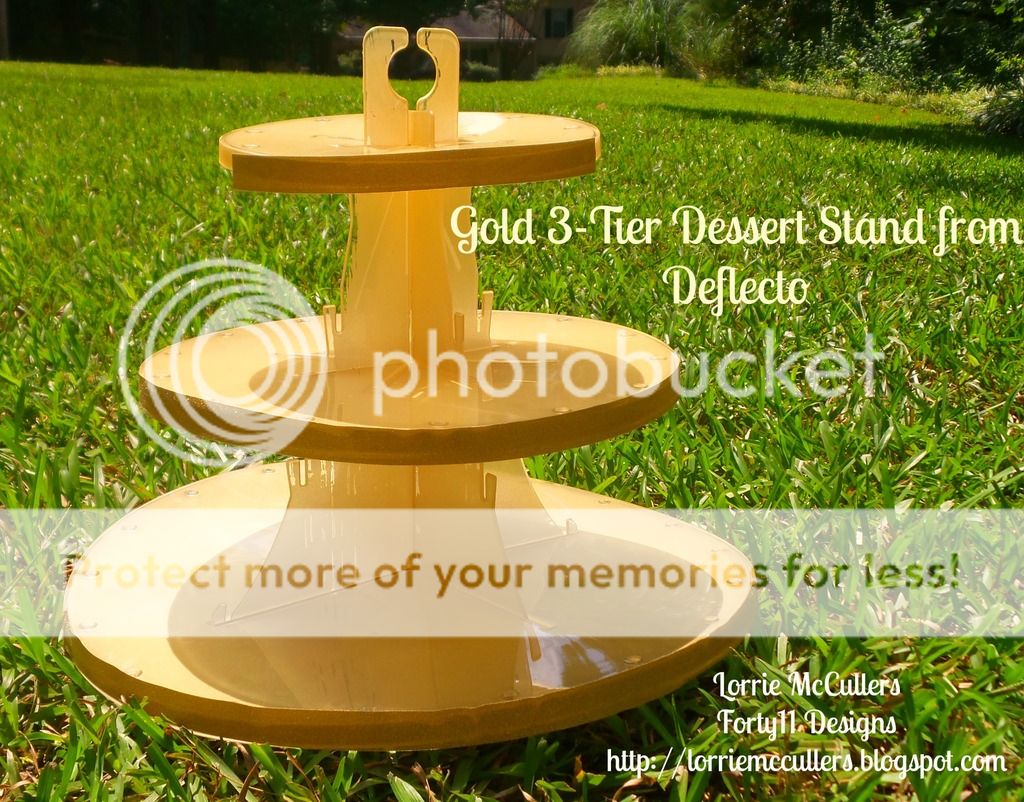
Today, I am featuring the 3-Tier Dessert Stand from Deflecto. This stand is amazing because you can aadjust the height of the plates (great for taller cupcakes) and it completely knocks down to store flat. Yes, it stores totally flat so you aren't scrambling to find storage space for it in your kitchen!

It's made from beautifully clear acrylic that matches any decor and is easy to clean. However, I wanted to jazz it up a little, but still have it be able to match anything. So I used an amazing product called "Tint It" from Design Master. It's a transparent dye in a spray can that you can use to change the color of almost anything. It works beautifully on Deflecto's acrylic products! For this project I used their "gold shimmer" Tint It to give it just the right amount of sparkle. It also will also match any celebration decor!


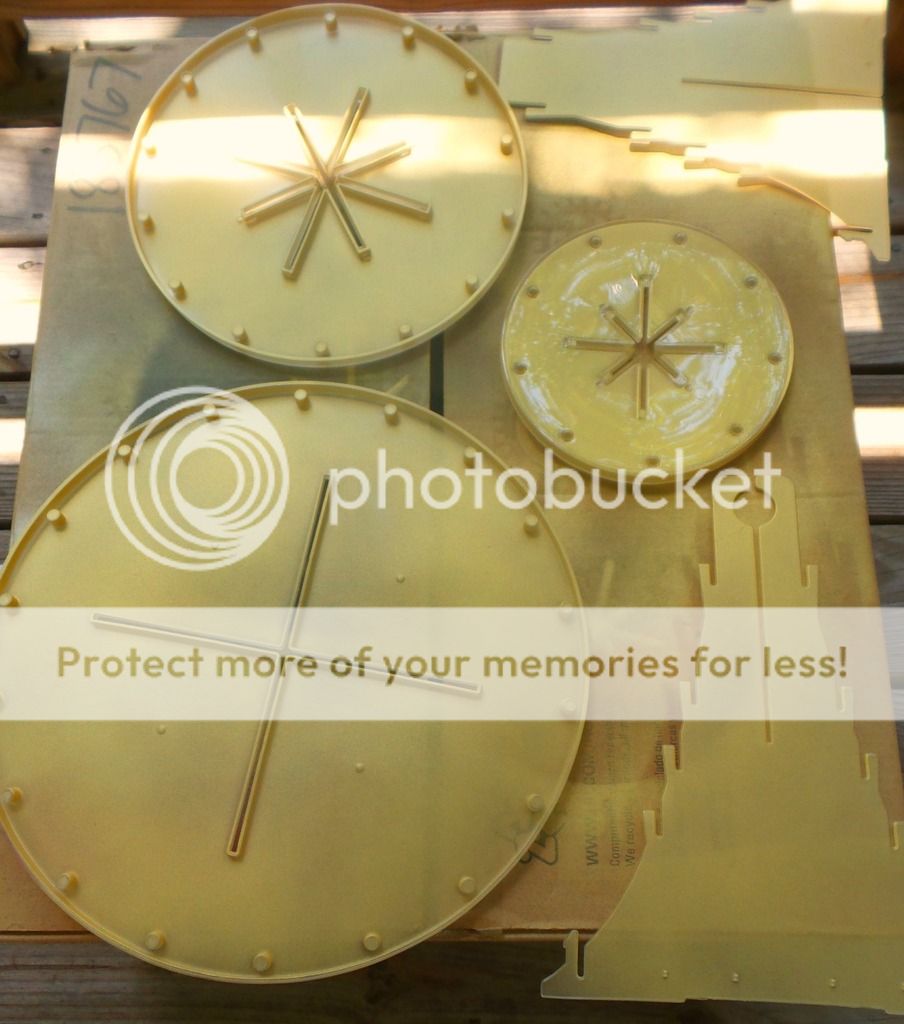
I sprayed the under-side of all three tiers of the dessert stand. I only sprayed the under-side so that the top would still be food safe and easy to clean. I also sprayed the two supports. The great thing about the Tint It spray is that you can adjust the color strictly by spraying it a little or a lot! I sprayed mine a lot to give it a more opaque finish.

I then finished it off the edges with some gold sparkle tape from Darice. The great thing about this stand is that tape is easy to remove so you can customize it to any celebration! Add ribbon for birthdays, gold sequins for New Year's Eve... the possibilities are endless!

To see what other designers in this blog hop have done with these amazing Deflecto products, go to the Designer Crafts Connection logo in my sidebar.

Are you social? We are too! Please check us out at the following locations:

Deflecto Craft - Facebook Page


Disclosure: This is a sponsored post. As a member of the Deflecto Design Team I have been provided product in exchange for my creative ideas, views and opinions.

Friday, March 18, 2016

Hoppin' with Deflecto and Stampendous!

We’re super excited this week to play with our friends over at Stampendous. With two amazing teams joining in the fun you will want to check in every day of the hop.  There will be some fabulous projects, and we’re going to be showing them off all week long.


The super talented team from Stampendous will be showing off their projects this week too so be sure to check out their blog too!

Are you social? We are too! Please check us out at the following locations

Deflecto Craft - Facebook Page


Stampendous - Facebook Group

Stampendous - Facebook Page


For this week's hop project, I used the black 5X7 craft frame from Deflecto and the "Family Home" and "Home Forever" stamps from Stampendous.

I stamped the sentiment from the "Home Forever" stamp onto yellow cardstock using black ink. I then attached the cardstock to patterned paper featuring cute little houses that matched the stamps perfectly. I finished the piece by edging the yellow carstock with washi tape and inserting it into the frame. 

Next I stamped the houses using the "Family Home" stamps on white cardstock. Seriously -- how adorable are these? I love that the little houses have words and phrases on them like "love nest" and "home for hugs". And the set is great because it comes with home-related sentiments as well as the house images. I colored them using Copic and Spectrum Noir markers.


I then edged the frame's opening with blue ribbon to add a little texture. I cut out the stamped house images and attached them to the frame using adhesive foam dots for added depth. 

This was such a fun project and would be a great gift for a house-warming party!

Now you’ll want to get your commenting fingers ready! Each comment on a post this week will enter you to win a fabulous prize package! (one comment per post, per person) Contest open to USA residents only.

We have three prizes, and each will have a 3 Tiered Cake Stand from Deflecto AND a $20 Reward Card from Stampendous.

Displaying CRS5087_DCS5087_SSH57.jpg


Now click on the links below and get to hoppin'! Remember to comment on each blog and then return to the Deflecto Blog and leave a comment there for your chance to win.


Thursday, June 25, 2015

Proggy Rug Rainbow Pillow Featuring Oly*Fun Fabric


Today, I am participating in a manufacturer's challenge showcasing products from Fairfield (the makers of PolyFil, American Spirit batting, and lots of other sewing/fabric products). I used their versatile Oly*Fun fabric to make a no-sew "proggy" pillow!

First of all, you may be asking, "What is Oly*Fun?" Well, Oly*Fun is an awesome, water-repellant fabric that can be used to make just about anything. You can use it like you would use paper or fabric so it's very versatile. It comes in a wide array of colors, and it is perfect for outdoor projects because it's weather-resistant.

Next you may say, "Then what is 'proggy' rugging?" Proggy (or proddy, depending on what area of Great Britain you are from) is a style of rug-making that uses small strips of fabric, a pointy-tipped tool called a proddy, and burlap (or "hessian" as the Brits call it!). Now, while this technique is mostly used for rugs, you can use it to make wreaths, stuffed toys, and more.

Check out this short video that explains how to make a proddy/proggy rug. This lady does a great job explaining how it's done, plus her accent is fantastic!


My favorite part about this pillow is that it is completely NO-SEW! Yep, not one single thing is sewn on this pillow, making it perfect for non-sewers (like me!) and older children!


Materials needed:
Oly*Fun fabric by Fairfield
PolyFil polyester fiberfill by Fairfield
proggy tool by Craft Yourself Silly
Burlap

1. Cut Oly*Fun fabric into strips of approximately 1/2"wide and 2-3" long. You need enough fabric for about three times the area of your finished piece.
2. Get a piece of loose weave burlap. It needs a more loose weave so that the proggy tool will go through the holes more easily. Size of the burlap depends on how large you want your pillow.
3. Fold one edge of the burlap over about 2 inches. Always work from the back of the project (the front will be the fluffy side).
4. Starting in the middle of the row, poke a hole through the burlap with the proggy tool. Use the proggy to poke the fabric through the hole. Then move over three strands of burlap and poke another hole, weaving your fabric into this hole.
5. Move over three more strands of burlap and repeat the process until you get to approx. 2 inches from the ends. Fold over the ends and repeat steps 4 and 5. You will fold over all 4 sides of your burlap until all sides are finished and you have a square.
6. Once your borders are done, continue filling in the middle. You can work in rows or just random -- its up to you!
7. After the burlap is filled in, take a piece of Oly*fun and cut it approx. 2 inches larger on all sides than your burlap square (so if your burlap square is 12x12, then your fabric should be 16x16).
8. Cut fringe into the Oly*fun edge with each fringe strip measuring 2 inches by 1/2".
9. To attach the backing, use your proggy tool to poke the fabric through already established holes once(the backing and fabric will share holes). Repeat until 3 edges are complete. Leave the 4th edge open so you can stuff the pillow.
10. Stuff the pillow with polyester filling.
11. Finish last edge with the larger Oly*Fun backing

To get you started on your own pillow for less, use coupon code AMYCOUP to save 20% on orders at Fairfield World through the month of June!

For more "pillow talk" from other designers, just click on the Designer Crafts Connection logo in the right sidebar!

Monday, July 15, 2013

Rowlux Illusion Film Blog Hop

A great big hello to everyone coming here from the Rowlux® Illusion Film Blog Hop!

Materials used:
Rowlux® Illusion Film
Adhesives - Glue Arts, Elmer's, Mod Podge by Plaid
Embellishments - The Robin's Nest and Recollections plastic beads, Basically Bare chipboard, Stampendous Pearlized Mica Fragments, KI Memories, Colorbök, Making Memories, and Advantus chipboard letters

Photo courtesy of Georgia Aquarium 

As soon as I saw the Rowlux® Illusion Film, I envisioned the ocean. It has that same beautiful, shimmery quality as the surface of water in the sun. So I couldn't wait to use it on a scrapbook page about a behind-the-scenes tour that I took with my friends at the Georgia Aquarium. 

I used the "Dark Blue Sea Glass" Rowlux® Illusion Film as the entire background, "Emerald Moire" as the seaweed, and "Gold Serpentine" on chipboard for the little fish!

I was so amazed at how easy the Rowlux® Illusion Film is to work with! My scissors just cut through it like regular paper, and my photo and embellishments adhered to it easily. It's very light and easy to put into a scrapbook album. I also really loved the reflective quality of the film; even when layered on top of other colors of film or on chipboard, it remained just as shimmery!


I could try to explain exactly what Rowlux® Illusion Film is, but to just say that it is reflective plastic doesn't do it justice, so here's how Rolux® describes this cool product:
"Rowlux® Illusion Film is made in the USA and comes in a diverse range of spectacular eye-catching colors and patterns.  These durable, translucent, 12" x 12" polycarbonate sheets add instant pizzazz to craft projects, seasonal accents, party decorations, scrapbooks, greeting cards, jewelry, furniture, frames, gifts, favors, accessories, art and DIY home decor projects.

 This revolutionary material has been utilized in award winning point of purchase displays, packaging, signage, artwork, footwear, lighting, interior design, retail display fixtures and beyond, but the new frontier is the craft industry! There's absolutely nothing like it on the market!
 Easily cut with scissors, Rowlux® is also the perfect material for scoring, folding, embossing and die cutting. The creative possibilities are endless. This innovative and inspiring new craft material manipulates light to create dazzling visual effects. The illusion of depth and motion is the result of thousands of tiny parabolic lenses that are molded into the surface of both sides of the material. These lenses create a pattern of light reflection and refraction resulting in stunningly brilliant optical effects.
To instantly add "POP" and "WOW" to your projects, just add Rowlux®!"


Want to try it? You can get your own Rowlux® Illusion Film here at Amazon!
And there's a giveaway! Just use the Rafflecopter link below to enter.

a Rafflecopter giveaway

Thank you so much for stopping by to look at my project!
Continue to check out the Rowlux® Illusion Film Designer Blog Hop here!


Images by Freepik