Wednesday, June 24, 2015

Creating with Joy - Dollar Store Summer Makeover

You may know from my last post that I love summer. However, there is something I love even more than summer: saving money!

I am a crazy frugal girl; heck, I was even a panel speaker at the International Coupon Conference a few years ago! So it is almost needless to say that I do a lot of shopping at the Dollar Tree. I can always find a good bargain there. Just this month, I found a fun tropical print tote bag and a pair of all black sunglasses, each just $1. Cute enough as they were but kind of plain. So I gave these two items a million dollar makeover with Joy embroidered letters!


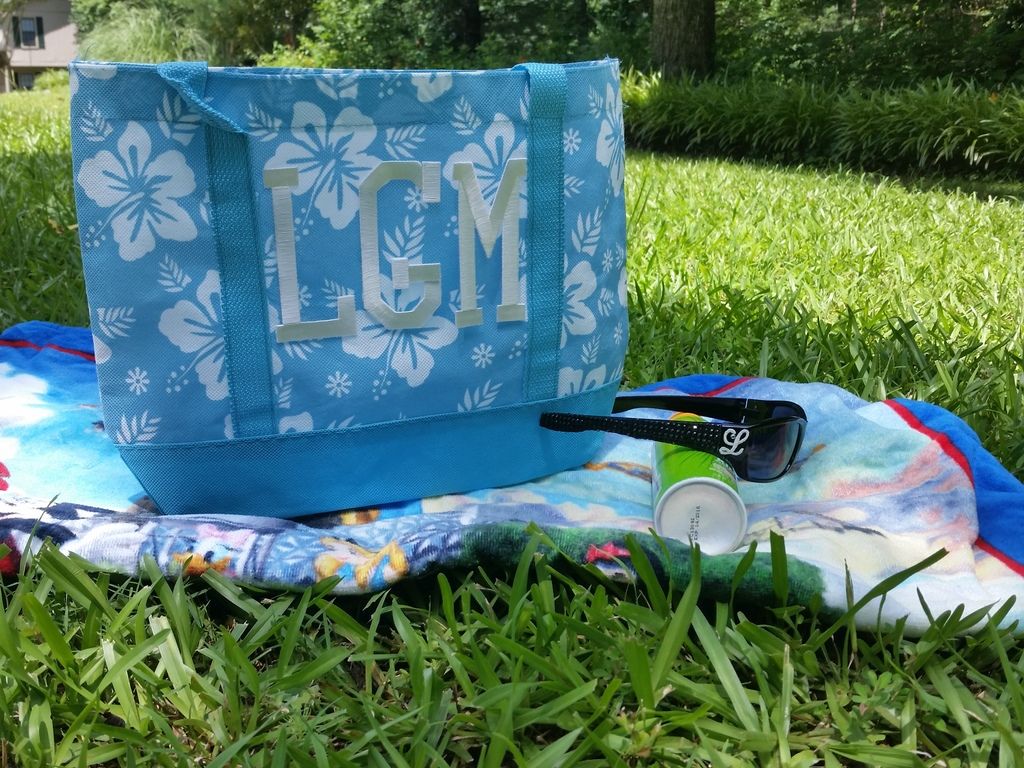
I used the white varsity letters on the bag to add my initials. Full disclosure here: I didn't iron these letters on since the bag is made of a synthetic material that doesn't hold up to an iron. Instead, I attached the letters using 3-in1 Adhesive from Beacon Adhesives and it worked perfectly. However, if you use a bag that is made from canvas or another fabric that won't melt when subjected to heat, iron those letters on -- it's super easy! Just iron from the back side of the fabric!


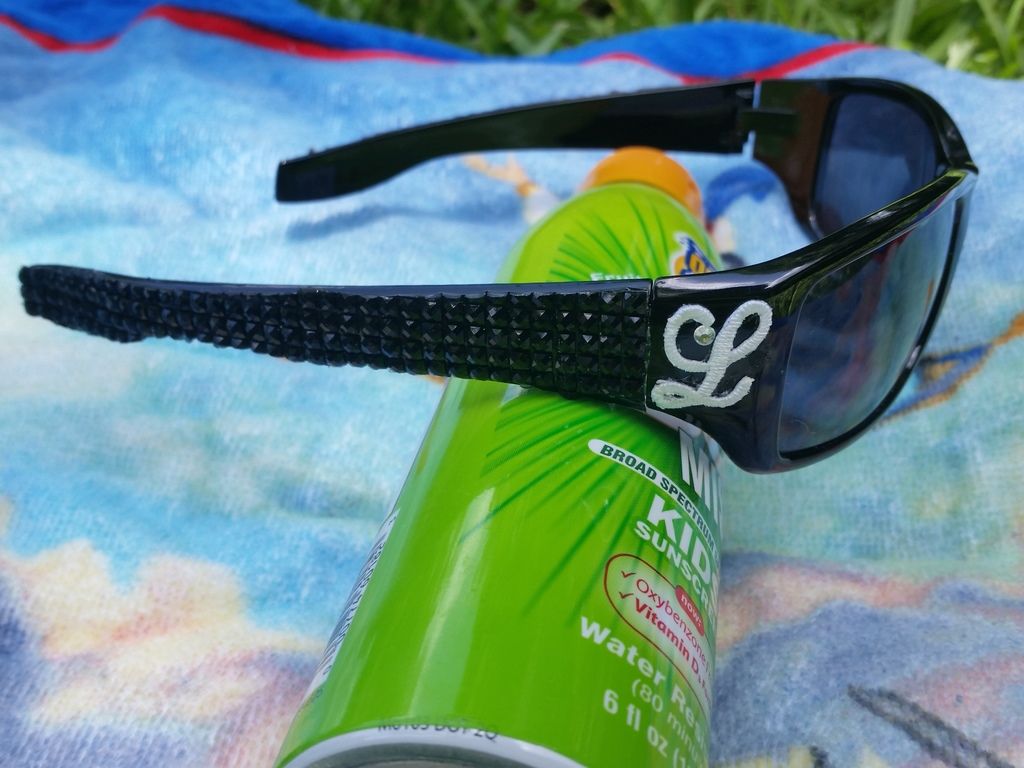
Next, I used Joy's small monogram letters to add my initials to each side of the glasses again using Beacon's 3-in-1. And since a girl can never have enough bling, I added a clear rhinestone to the letter and used black adhesive rhinestone sheets from The Buckle Boutique to decorate the earpieces (I laid the earpieces down on a sheet of scratch paper and traced around them, then used that as a template for cutting my rhinestone sheets).

Now, instead of just an everyday bag and pair of glasses, I can hit the pool looking like a million bucks!

Want more ideas on how to use Joy letters? Come on over to the Creating with Joy blog. My fellow designers have some amazing ideas!

Materials used:
Joy embroidered letters
tote bag and glasses from the Dollar Tree
adhesive rhinestone sheets from The Buckle Boutique
adhesive from Beacon Adhesives
single rhinestone from Want2Scrap

Disclosure: I received these embroidered letters from Joy as a part of their design team. However, I received no compensation or consideration from Dollar Tree or any other companies included in this post. All opinions are my own.

Friday, June 12, 2015

Summer Vacation Dry Erase Countdown Calendar

"Summer summer summertime
Time to sit back and unwind..."

Yeah, so I am channeling my inner DJ Jazzy Jeff and the Fresh Prince right now. Why? Because it's summer!

I have always loved summer. The laid-back times, the hot weather, my birthday -- I love everything about it. But the best thing about summer has to be vacation. It seems like almost everyone takes a summer vacation and it's something to look forward to during those long winter months.

So how about a summer vacation countdown calendar to mark the days until your getaway?


I used the Deflecto sign holder that is made especially for cubicles (it comes with mounting clips, Velcro, and magnets so that you can mount it almost anywhere). Won't your co-workers be jealous of your upcoming adventure and your cool calendar? Just keep track of the days with a dry-erase marker, writing the days left on top of that cute little die-cut suitcase.

So where are you going this summer?

Materials used:
"Going Places" and "Base Camp" Cricut cartridges
We R Memory Keepers "Jet Set" collection
SEI paper and washi tape
K and Co. dimensional stickers 

Disclosure: This is a sponsored post. As a member of the Deflecto Design Team I have been provided product in exchange for my creative ideas, views and opinions.

Friday, May 22, 2015

Creating with Joy Frame

I am Creating with


Joy S.A. Embroidered Letters & Appliques for Wearables & Home Decor 

I am pleased to announce that I am going to be a part of the "Creating with Joy" ambassador team. Joy S. A. Inc. makes awesome embroidered applique letters and designs that make any project beautiful.

Joy S.A. is sponsoring a blog hop with Designer Crafts Connections so be sure to check out all the amazing projects from the other designers. Use the arrows beneath the logo in my sidebar to the right to navigate the web ring.  And there is a new blog that where we will be sharing our projects each month -- check it out here!

Here's my project!


I am a huge Atlanta Braves fan, so I wanted to make a frame to feature my favorite teamI just added the Joy 3" Varsity Letters in red to a clear acrylic frame from Deflecto to go from plain to fab! These letters are gorgeous! The embroidery is beautiful and the adhesive really sticks, making them a great way to personalize almost anything.

For more inspiration, look through all of the projects on the DCC blog hop and check out our "Creating with Joy" blog and Facebook page!

Thanks for stopping by!

Disclosure: This is a sponsored post. As a member of the Deflecto Design Team I have been provided product in exchange for my creative ideas, views and opinions.


Monday, May 11, 2015

Father's Day Car Guy Frame


We just celebrated our moms on Mother's Day, so now let's turn our attention to the dads out there!

For this Father's Day, I am giving my dad something that combines two of his loves: me and cars! You see, my dad has always loved cars. He knows more about cars than almost anyone I know, Because of him, I have attended lots of classic car shows, drag races, and NASCAR races, and I have loved every minute of it too.

The picture above is me and my dad at a NASCAR race at Talladega a few years ago. The picture needed a cool frame to go with it, and the Deflecto curved magnetic frame was just right. (By the way, this frame is so neat because the frame snaps together with magnets and the photo just "floats" between the two panels.) I placed my photo on Rowlux Illusion Film and placed it in the frame. Then I added some fun car-themed stickers and die-cuts to the frame itself to give it a "high-octane" look!

So if your dad is a car guy, give him a gift that will rev his engine!

Materials used:
Deflecto curved magnetic frame (5"x7")
Rowlux Illusion Film in Red 3-D
Die Cuts with a View car die cut
Creative Imaginations stickers
Studio G by Hampton Art glitter glue
Glue Dots adhesive

Disclosure: This is a sponsored post. As a member of the Deflecto Design Team I have been provided product in exchange for my creative ideas, views and opinions.

Monday, April 20, 2015

Mother's Day Masterpiece Magnet


May will be here before you know it, and with it comes Mother's Day!

My mom always loved the gifts I made for her the most (and she still does), and I think most moms are the same way. So this month's Deflecto Crafts project is a fun gift for moms that they will love and kids will love to make!

I started with the Deflecto customizable magnetic craft sheets. These sheets are so easy to use! They have a white facing to them that can be painted, inked, covered with paper... you name it. They can also be easily cut with scissors and craft knives and you can use punches and die cut machines. (These sheets are being rolled out to stores soon -- ask your local craft store to carry them!)


I just used a ruler, a permanent marker, a pair of scissors, and a craft knife (for the center) to cut out my frame, making it 4" x 5". The great thing about this simple frame is that you can let kids make whatever design they want using markers or paint, drawing directly on the white surface. I used Copic and Spectrum Noir markers, giving my frame a little bit of a stained glass look.

For the finishing touch, I put a school picture in the frame and added a little tag that says "Happy Mother's Day from your little masterpiece!"

And yes, that little girl in the picture is me in the 3rd grade!

Materials used:
Deflecto magnetic craft sheets
Copic and Spectrum Noir markers
Fiskars Amplify mixed media scissors
Fiskars fingertip craft knife
Martha Stewart Crafts permanent marker

Disclosure: This is a sponsored post. As a member of the Deflecto Design Team I have been provided product in exchange for my creative ideas, views and opinions.

Tuesday, March 24, 2015

Springtime Gypsy Earrings


This year, I was lucky enough to be invited to the Blogger Networking Event at CHA (hosted by FaveCrafts). This is an opportunity for us bloggers to meet with crafting manufacturers so we can get the word out to you readers about new and awesome products.

One of my favorite products from the event had to be the sweet treasure trove of Swarovski crystals from PrimaBead.com. I am like a magpie -- I adore anything sparkly! I used some of these gorgeous crystal beads to make a pair of gypsy-inspired earrings. These earrings are super-easy to make; if you can open and close a jump ring, you can make these!

Springtime Gypsy Earring Instructions:

  1. Start with a chandelier-type earring finding.
  2. For outer beads, place 3 bicone beads on a head pin. Create a loop at the top of the head pin and attach to the earring with a jump ring.
  3. Attach the rest of the crystals to your earring with jump rings.
  4. Attach earring to earwires (I didn’t use a jump ring so that the earring would face forward. If you prefer your earrings to swing sideways, use a jump ring.).

Materials List:

  1. Swarovski crystal beads (I used these, these, these, and these.)
  2. Chandelier earrings (I got mine at Hobby Lobby -- there are lots of different styles to choose from).
  3. Earwires, jump rings, and head pins (Again, I got all my findings at Hobby Lobby).
  4. Round-nose jewelry pliers
I would love to see your version of these earrings! If you like these, pin them on Pinterest!


Wednesday, March 11, 2015

Wearing o' the green!

It's March which means it's time for St. Patrick's Day! It's also National Craft Month so it's also time to make something. So let's go green!


I decided that for this month's Deflecto design team project, my frames needed to wear the green! And I got to decorate my frames with the decorating items that I love most: washi tape, buttons, and (my new favorite) glass stones.


My first frame was already decked out in green; it's one of Deflecto's cool acrylic frames with a color border. Then I just added green-striped washi tape and lots of buttons in all shades of green. 


My second frame was a just clear acrylic frame that got jazzed up by some green glass stones. The best part about these stones? They came from the Dollar Tree! Yep, a big bag of these beauties were only $1. They may have been inexpensive, but they look like a million bucks! They were so easy to attach too; I put a thin line of Beacon Quick Grip adhesive around all four edges and stuck the glass on (the quick grab of this adhesive means this frame was ready to go in about 15 minutes).

But of course, a frame is just a frame without a picture, right? I am especially proud of these photos as they were taken in Ireland. The "Leprechaun Crossing" sign was taken at Killarney National Park in Co. Kerry, Ireland. The photo of my husband and me was taken near Dingle in western Ireland. We are posing with a ogham (pronounced "ohm") stone. An ogham stone is an upright stone inscribed with the lines and notches of the early Irish ogham alphabet. This stone has a hole in it; people would use these stones with holes as a way to make deals. If you touched fingers through the hole in the stone, the was binding until death.

Materials used:
Frames: Deflecto
Washi Tape: Darice
Glass stones: Dollar Tree
Buttons: miscellaneous

Disclosure: This is a sponsored post. As a member of the Deflecto Design Team I have been provided product in exchange for my creative ideas, views and opinions.

Monday, February 2, 2015

Valentine Frame Projects


It's February and love is in the air... and I am in love with these frames!

For the first frame, I used this cool beveled edge frame from Deflecto. I stamped directly onto the frame with white Staz-On ink.


I used a background stamp from Hero Arts and just used the edges to stamp around the edges of the frame.

Never stamped on acrylic before? It's easy! Just make sure you use a solvent-based ink like Staz-On. Mess up? No problem! I use a product called Bestine which is a paint thinner/solvent on a paper towel -- the ink wipes right off.


I love this technique because it gives the look of glass etching.

The next frame was inspired by the big trend at this year's CHA show: GOLD!


I used a pink-edged acrylic frame for my base. I added gold glitter tape from Darice around the edges of the frame opening. I then used ribbon that I have been hoarding for years! It's so cute -- the words "I Love U" are actually cut out of the ribbons and edged in gold. Finally, I added some hot pink and gold bling to each corner of the ribbon.

Here's wishing y'all a wonderful and love-filled Valentine's Day!

Materials used (stamped frame):
Deflecto Crafts bevel edge frame
Staz-On Ink from Tsukineko
Butterfly embellishment from SEI
Thermoweb adhesive Zots

Materials used (pink frame):
Deflecto Crafts acrylic frame
Gold glitter tape from Darice
ribbon
Twinkle Goosebumps embellishments from Queen and Co.
Pink rhinestones from Want2Scrap
Thermoweb adhesive Zots

Disclosure: This is a sponsored post. As a member of the Deflecto Design Team I have been provided product in exchange for my creative ideas, views and opinions.
 
Images by Freepik